A clean boot allows you to troubleshoot and find program and driver issues, and here’s how to accomplish it on Windows.
Key Point: For a clean boot on Windows 11 (or 10), initiate “MSConfig,” access the “Services” tab, select “Hide all Microsoft services,” and click “Disable all.” Subsequently, navigate to “Task Manager,” visit the “Startup” tab, disable all applications, and proceed to restart the computer.
Table of Contents
A clean boot in Windows 11 (and 10) refers to the process of starting the system with all programs, services, and drivers disabled during startup. When troubleshooting a problem, a “clean boot” will help you avoid program conflicts that occur during upgrades, software installations, or when running a specific app.
System utilities, antivirus, and other applications may typically include processes that can interfere with the normal operation of the operating system, such as Blue Screen of Death (BSOD), unexpected freezes, performance difficulties, and more.
In this post, I’ll show you how to conduct a clean boot on Windows 11 (and 10) to help you diagnose and resolve issues in your setup.
Execute a clean boot on Windows.
To troubleshoot difficulties, run a clean boot of Windows 11 (or 10) as follows:
- Open Start on Windows.
- Look for “msconfig” and select the primary result to launch the System Configuration application.
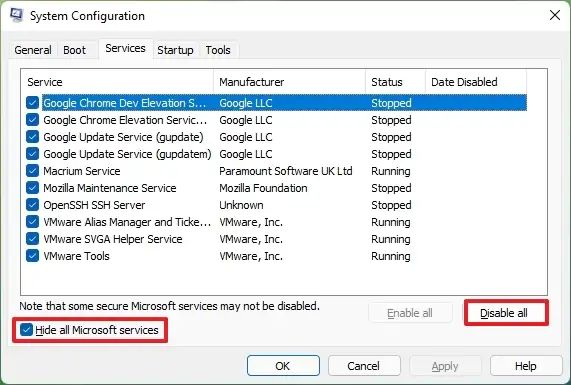
- Click the Services tab.
- Check the “Hide all Microsoft services” option.
- Click the Disable all button.

- Click the Startup tab.
- Click the “Open Task Manager” option.
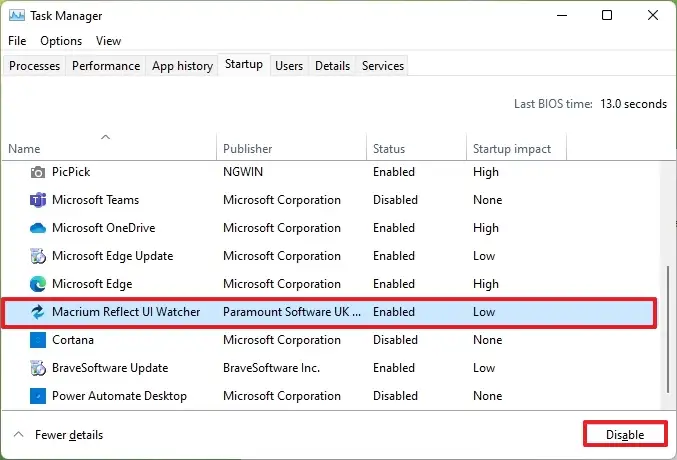
- Click the Startup tab.
- Select each item and click the Disable button.

- Close Task Manager.
- Restart the computer.
If the problem is no longer an issue after you finish the steps, you will have a better notion of where to search to continue troubleshooting and discover a lasting solution.
You should try to apply updates that were previously failing to install as part of the troubleshooting process after starting the device with a clean boot. You can also try to install or remove software, as well as begin an application that was previously not launching.
Windows will perform a clean boot.
Use the following procedures to perform a clean boot and a normal boot on Windows 11 (or 10):
- Open Start.
- Explore “msconfig” in the search bar and choose the primary outcome to access the System Configuration application.
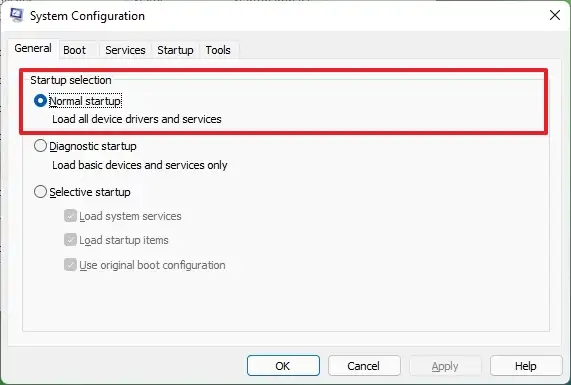
- Click the General tab.
- Select the Normal startup option.

- Click the Services tab.
- Check the “Hide all Microsoft services” option.
- Click the Enable all button.
- Click the Startup tab.
- Click the “Open Task Manager” option.
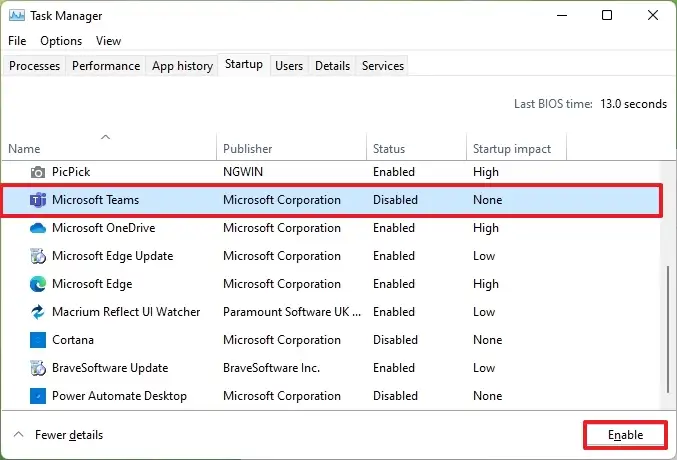
- Click the Startup tab.
- Choose each item and activate it by clicking the Enable button.

- Close Task Manager.
- Restart the computer.
When utilizing this method, keep in mind that “Windows Clean Boot” is not the same as “Safe Mode.” In Safe Mode, the system boots with a basic set of drivers and services and continues to boot third-party drivers and programs.
A clean boot, on the other hand, starts the system normally but disables third-party applications, services, and drivers as the computer begins to troubleshoot and resolve problems with apps, services, and drivers on Windows.
If a clean boot does not solve the problem, try booting Windows 11 in Safe Mode to continue troubleshooting. (You can use these steps to start Windows 10 in Safe Mode.)
Finally, executing a clean boot on Windows is an effective troubleshooting strategy for isolating and identifying issues with third-party apps and services. A clean boot helps detect whether conflicts or compatibility issues are causing system problems by selectively disabling non-essential startup apps and services. This step-by-step procedure supports users in determining the root cause of problems or performance difficulties, allowing for a more targeted and successful resolution. Furthermore, the clean boot method is a methodical strategy that supports in the maintenance of a stable and optimum system environment by avoiding unwanted background processes during troubleshooting.


